

Pixel density Edit test images |

|

|

|

|

|
||
|
Pixel density Edit test images |
|
|
|
|

|

|
Pixel density
Edit test images
|
Pixel density Edit test images |
|
|
|
|
|
||
|
Pixel density Edit test images |
|
|
|
|
|
|
|
|
||
The Edit test images window will appear when you select items from the pop-up menu of the Pixel density box:
In the first case, the current test image of the Pixel density box will be loaded into the window for editing.
In the second case, any photo can be loaded, which can be turned into a test image for VideoCAD.
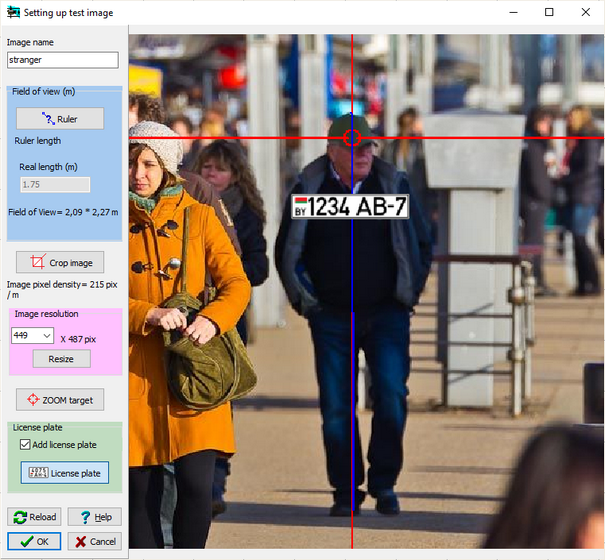
Test image editing procedure
1. In the Image name field, you can enter an arbitrary name for the test image.
2. Then you should set the size of the target object on the photo.
Target object is an object, resolution of which will be modeled on this test image. For example: a person, a car.
On the Field of View panel, click Ruler and mark the size of the target object by two clicks on the photo. In the Real length box, enter the actual size of the target as you know it.
Photos are taken with perspective projection, which means that the size of an object on the photo depends not only on its physical size, but also on the distance from the shooting point. You can select any target and specify its size. This object and other objects located at the same distance from the shooting point can be used to simulate pixel density. Objects located at other distances from the shooting point cannot be used for modeling.
3. Cut off the extra fields from the photo, leave only the target object. Extra pixels in the image will increase scaling time of the image. To crop, click on the Crop image button and frame the target object with a frame.
To get a solid background on your test image, as on the default test images, you need to paint over the entire background of the photo, except of the target object, with any color that matches the color of the upper left pixel of the photo. This can be done in Paint before adding the photo to VideoCAD.
4. Pay attention to the string Image Pixel Density =. This is the maximum pixel density that can be modeled by this photo. The optimal value for common tasks is 400-800 pix / m.
Too high pixel density and high pixel resolution will lead to delays in scaling this image when building tables.
If the pixel density is too high, use the Image Resolution panel to decrease the number and density of pixels on the test image. Just enter the reduced number of pixels horizontally and click Resize.
5. Now you need to specify on the photo a point to which the camera will keep its direction when scaling the image. Click on the ZOOM Target button and specify a point by clicking on the photo.
For example, it can be the bridge of the nose in the case of photo of a person.
6. If you need to add the default license plate to the test image:
| 1. | Check the Add license plate checkbox. |
| 2. | Click on the License plate button. |
| 3. | Specify the number placement point on the image. |
7. After finishing editing, click OK to save the resulting test image to the VideoCAD library.
You will be able to select this image in the Pixel density box via the Select test image pop-up menu item. The selected test image can be edited.
To cancel editing and reload the photo again, click Reload. To exit without saving, click Cancel.