Modeling PTZ cameras |

|

|

|

|

|
||
|
Modeling PTZ cameras |
|
|
|

|

|

|
Modeling PTZ cameras
|
Modeling PTZ cameras |
|
|
|
|
|
||
|
Modeling PTZ cameras |
|
|
|
|
|
|
|
|
||
The following tools can be used to simulate a PTZ camera in VideoCAD:
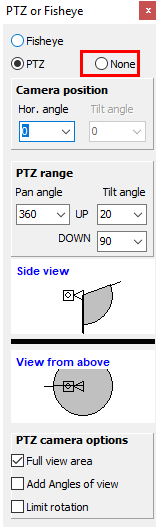
1. PTZ or Fisheye box for modeling full circular view area of PTZ camera. The view area is modeled with visualization of Shadow and pixel density in the Graphics window and in the 3D World window. When constructing the view area, the limiting angles of rotation and inclination up and down are taken into account.
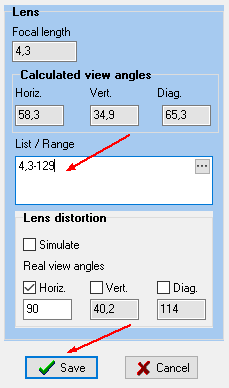
2. List / Range of Lens focal length for modeling the range of Lens focal length of the PTZ camera.
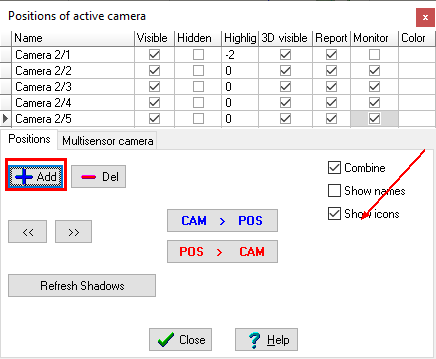
3. Positions of active camera window for simulating PTZ presets.
Problem
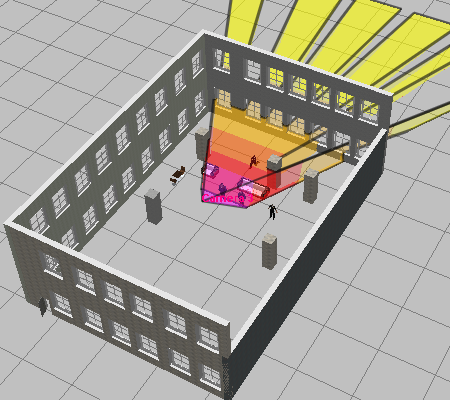
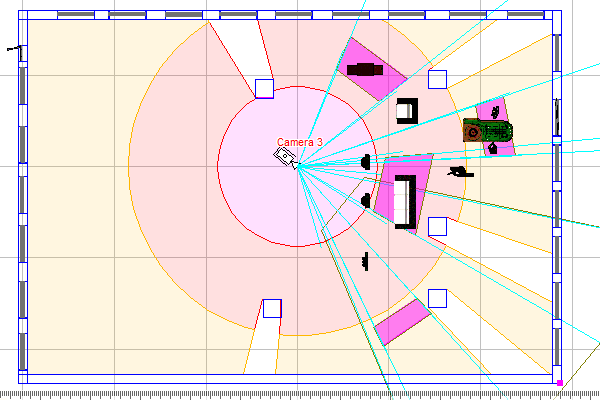
There is AXIS Q6124-E camera. The camera is installed at height of 3 m in the center of a rectangular room 20 * 30 m. The height of the room is 10 m. It is necessary to make models of the view area of the camera in this room in the height range of 0.5-2 meters in horizontal projection and along the entire height of the walls in 3D. It is required to obtain the projection of the view area, the view area in 3D, distribution of pixel density and get model of image from this camera.
Camera parameters according to the manufacturer's specifications, important for modeling the view area:
Since the camera’s parameters give accurate angles of view, we can simulate the view area more accurately, taking into account the lens distortion and actual size of the active area of the Image sensor. In this example, big accuracy is not needed, so we will not use the angles of view in the model.
|
|
Order of work
1. Create a camera by clicking the New camera ![]() button. In the camera creation dialog select the Camera icon
button. In the camera creation dialog select the Camera icon ![]() outdoor/PTZ.
outdoor/PTZ.
Assigning a special icon is optional. In the future, you can change the icon in the ![]() Camera list window.
Camera list window.
If the camera model is present in the database of real camera models, then there is no need to enter the camera parameters manually, just select the model from the Active Camera Model list or in the Table of Camera Models. The manual input of parameters is described below, for a case this camera model is not available in the database of real models.
2. Set camera parameters in the
|
|
3. Open the
Enter in the List / Range box the range of change of the lens focal length: 4.3-129
Click on the Save button. |
|
4. Model a room 20 * 30 meters with 10 meters of height by the tool
See Example
Place the camera in the center of the room.
Set the far bound of the view area at the inner edge of the room.
Enable modeling shadows by selecting |
|
5. Open the
Mark the PTZ switch and enter angles of panning and tilting Up and Down.
|
|
As a result, we get:
| • | In the Graphics window - the projection of the view area in the height range of 0.5-2 meters |
| • | In the 3D World window - the distribution of pixel density on the room in 3D. |
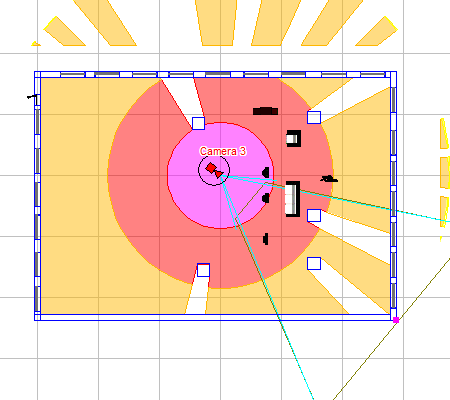

The pixel density corresponds to the set lens focal length - 4.3 mm. To obtain pixel density with a different focal length - change the focal length.
The maximum drawing distance of view area projections is determined by the Maximum distance of drawing view area.
![]() Modeling presets of PTZ camera
Modeling presets of PTZ camera
7. Open the
After filling the positions by presets, you can hide the image from the parent camera in the 3D Video window, leaving only images from the presets. To do this, right-click on the 3D Video window, select the Panoramic tab on the appeared Image parameter panel and mark the Show> Positions switch.
On the
Below there are examples of pictures that can be obtained:
Images from presets of the PTZ camera in the 3D Video window
View area projection and presets of PTZ camera in the Graphics window
Presets of the PTZ camera in the 3D World window
See also: Modeling multisensor camera, Positions of active camera, Panoramic, PiP, Modeling megapixel images
|