Work with background in AutoCAD formats |

|

|

|

|

|
||
|
Work with background in AutoCAD formats |
|
|
|

|

|

|
Work with background in AutoCAD formats
|
Work with background in AutoCAD formats |
|
|
|
|
|
||
|
Work with background in AutoCAD formats |
|
|
|
|
|
|
|
|
||
Normal sequence of actions at work in VideoCAD is:
1. Loading a background
2. Placing cameras, constructions, 3D models on the baclground.
3. Printing or exporting result of the work.
See more: Example
When the background is in AutoCAD format (DXF or DWG), the additional possibilities are offered:
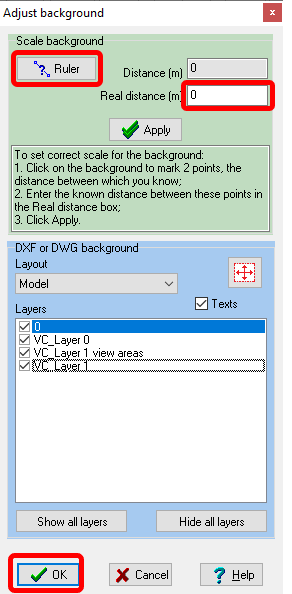
| • | Adjusting visibility of layers of the background, chosing layout, hiding texts . |
| • | Import constructions from a 2D background in AutoCAD formats to 3D VideoCAD constructions automatically. Use of this tool allows to reduce efforts of outlining background to convert it to 3D constructions. |
| • | Adding cameras and constructions of VideoCAD to the background in AutoCAD format on additional layers and then save the background to a file to work with it in AutoCAD. |
VideoCAD is not capable of processing all possible AutoCAD files. Usually simple AutoCAD files are processed well, but some complex files cannot be imported or imported with an error, some files can be opened, but cannot be exported or exported with an error, or cannot be converted to 3D constructions using the Import DXF/DWG background tool.
In case of any problems with the AutoCAD file, it is recommended to simplify it, but it is better to create a new file and copy only structures needed for the design into it.

Problem
There is a floor plan in DXF format. We need to place cameras on it and save the file with the cameras and their view area projections in the same format - DXF.
Order of work
![]() 1. Loading, scaling and adjusting visibulity of layers of the background
1. Loading, scaling and adjusting visibulity of layers of the background
Loading and scaling the background is performed by the same way as in the previous examples:
|
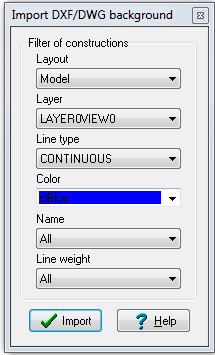
![]() 2. Import of 2D constructions from the background to 3D constructions of VideoCAD
2. Import of 2D constructions from the background to 3D constructions of VideoCAD
It is convenient to import 2D constructions from a background in AutoCAD formats to VideoCAD 3D constructions automatically. Use of this tool allows to reduce efforts of outlining background to convert it to 3D constructions. Specially prepared background file is not required, but if a background is pre-prepared in AutoCAD, then the efficiency of import will be higher.
Imported constructions are usual VideoCAD constructions, you can edit them. You can repeat steps 3..7 many times, to import different constructions from the background to different construction types of VideoCAD, on different heights, to different layers, by different colors etc. Not all types of background constructions can be imported. Starting from VideoCAD8 you can import lines and polylines on the layout or in blocks.
The Import DXF DWG background tool turns AutoCAD lines into VideoCAD 2D/3D constructions. If there are a lot of lines in the AutoCAD file then we get a lot of confused constructions, which can overload the computer. For a good result, it is recommended to use the Import DXF DWG background tool only with simple AutoCAD files, with low number of lines, and also use the line filters of this tool. The best result of the tool can be obtained with special prepared AutoCAD files where each line corresponds to a vertical plane. If this tool does not give a good result with your AutoCAD background, please create 3D environment by manually tracing lines on the background using constructions, as in the case of background in other formats, or create a specially prepared AutoCAD file based on your background.
|
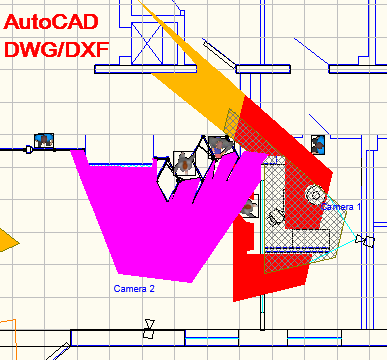
Place cameras on the background by the same way as in the previous examples. If lines on the background was transformed to VideoCAD's constructions, you can use shadows. You can see your project in 2D in the Graphics window and in 3D in the 3D World.
See previous examples.
|
![]() 4. Adding cameras and constructions of VideoCAD to the background file
4. Adding cameras and constructions of VideoCAD to the background file
Export to DXF and DWG (AutoCAD) is possible only in VideoCAD Professional
4.1 Move and scale working layout so that the background with cameras will be fully visible on the screen and activate one of the visible on screen cameras. 4.2 Make invisible the layers which you do not want to export. 4.3 Go to Main Menu> Drawing>Save As> *. dxf or Main menu> Drawing> Save As> *.dwg. 4.4 In the appeared Options box 4.4.1 Mark the Add to DXF/DWG background to add cameras and constructions of VideoCAD to the file of the background on separate layers. 4.4.2 Clear the Simplified export, because of during the simplified export adding to background is not supported. 4.4.3 Adjust Sizes of cameras, illuminators, non scalable fonts, hatching and dash lines if necessary.
On the Export tab only sizes of non scalable camera icons, illuminators and fonts is specified. If scaling of cameras, illuminators or a font is enabled, then the size of cameras, illuminators or fonts respectively will be exactly as displayed on the screen.
4.4.4 If raster images (projections of 3D models) must be inserted into the exported file, mark the Insert raster images.
Raster images are exported to a separate <export file name>_img directory in the directory of saving the exported DXF/DWG file. To the DXF/DWG file the references to the raster files are written. You must move the folder with raster images along with the DXF/DWG file.
4.5 When finish adjusting export, click OK. Standard file saving dialog will appear. Choose file name and directory then click Save.
The resulting file will be a copy of the background supplemented by cameras and constructions placed in additional layers.
Cameras with view areas are exported as AutoCAD blocks, view area bounds are exported as polylines. In attributes of the block the most important parameters of the camera are recorded: Name, Model, Lens focal length, Height of installation, Base height, Heights of view area lower and upper bounds, View angles, Number of pixels, Pixel density pattern, Quality level.
Illuminators are exported as AutoCAD blocks. In attributes of the block the most important parameters of the illuminator are recorded: Lamp type, Number and power of lamps, Height of installation. Distribution by layers, set in VideoCAD is saved.
To make transparent fillings of view area projections: 1. Before exporting, mark the View areas on special layers checkbox in the Options box. 2. After opening the file in AutoCAD, change the Transparency of layers with view areas VC_ <layer name> view areas.
To prevent regions with high pixel density in the resulting AutoCAD file from obscuring by regions with low pixel density, mark the High resolution on top checkbox in the Options box before exporting.
|
See also: Drawing>Load background, Drawing>Adjust background, Drawing>Save as, Drawing>Import DXF/DWG background, Options box>Export, Export 3D view areas to general 3D design software